In this article, our focus will be on guiding you through the process of setting up your own private VPN server. While our primary aim is to establish a VPN with basic settings for personal use, the scope of this tutorial isn’t confined to individual use only.
Before we deep dive into the step-by-step guide of setting up your own VPN server using OpenVPN on Amazon EC2, let’s take a moment to understand why using a Virtual Private Network (VPN) is crucial in today’s digital age.
VPN is a service that protects your internet connection and privacy online. It creates an encrypted tunnel for your data, protects your online identity by hiding your IP address, and allows you to use public Wi-Fi hotspots safely.
Here are some key reasons why using a VPN is important
Enhance Privacy and Security
Privacy and security are the primary reasons for using a VPN. By creating an encrypted tunnel between your device and the VPN server, a VPN ensures that your data is transmitted securely. This encryption makes your data unreadable to anyone who might intercept it, including hackers and your Internet Service Provider (ISP).
Bypass Geographic Restrictions
Some websites or services may be blocked or restricted in certain geographical locations. A VPN allows you to bypass these restrictions by changing your IP address to one from a different location, making it appear as if you’re browsing from there. This is especially useful for accessing content that’s only available in certain countries.
Safeguard Yourself on Public Wi-Fi
Public Wi-Fi networks are notoriously insecure and can be hotbeds for hackers and cybercriminals. Using a VPN when connected to public Wi-Fi ensures your private data is secure and that you’re protected from potential cyber threats.
What is OpenVPN?
OpenVPN is a powerful, open-source tool used to build site-to-site connections, and it’s also perfect for creating secure point-to-point connections.
Today, we will go thru about how to set up OpenVPN for personal use on Amazon EC2 using the pre-installed Amazon Machine Image (AMI). This will allow you to create a secure, private connection, production ready, which is essential for protecting your privacy online.

Prerequisites
Before we start, ensure you have the following:
- An Amazon Web Services (AWS) account. If you don’t have one, you can create it for free here.
- Basic knowledge of AWS services and Linux command line.
Step 1: Launching an Amazon EC2 Instance
First, we need to launch an Amazon EC2 instance. Follow these steps:
- Log into your AWS Management Console.
- Set the aws region from dropdown where you want to host your server, like for example “ap-south-1” in Mumbai
- Navigate to the EC2 Dashboard and click on “Launch Instance”.
- Give it a name
- In the Application and OS Images (Amazon Machine Image) section search for “OpenVPN Access Server”, choose “AWS Marketplace” on the left, Select the first option that appears.

- Choose an instance type. For personal use, a t2.micro instance should be sufficient, which falls under the free tier (For 12 months, If you have a new aws account).
- create a new Key pair or use an existing one. If you don’t have one, create a new key pair, download it, and store it securely
- Network settings should be populated automatically, you can adjust it, if you need

- OpenVPN requires two ports: 443 (HTTPS) and 943 (TCP), 945, 1194.
- Keep the “Configure storage“ default to 8 GB or update it according to your needs.
- Review the settings and click “Launch instance”.
Step 2: Configuring OpenVPN Access Server
After the instance is up and running, we need to configure the OpenVPN Access Server.
- Go to the EC2 Dashboard and click on “Instances” on the left.
- Select your instance and note down the Public IPv4 address.
- Open your terminal (or PuTTY for Windows users), navigate to the directory where you downloaded the key pair file, and connect to your instance using SSH:
chmod 400 your-key-pair.pem
ssh -i "your-key-pair.pem" openvpnas@your-instance-ip
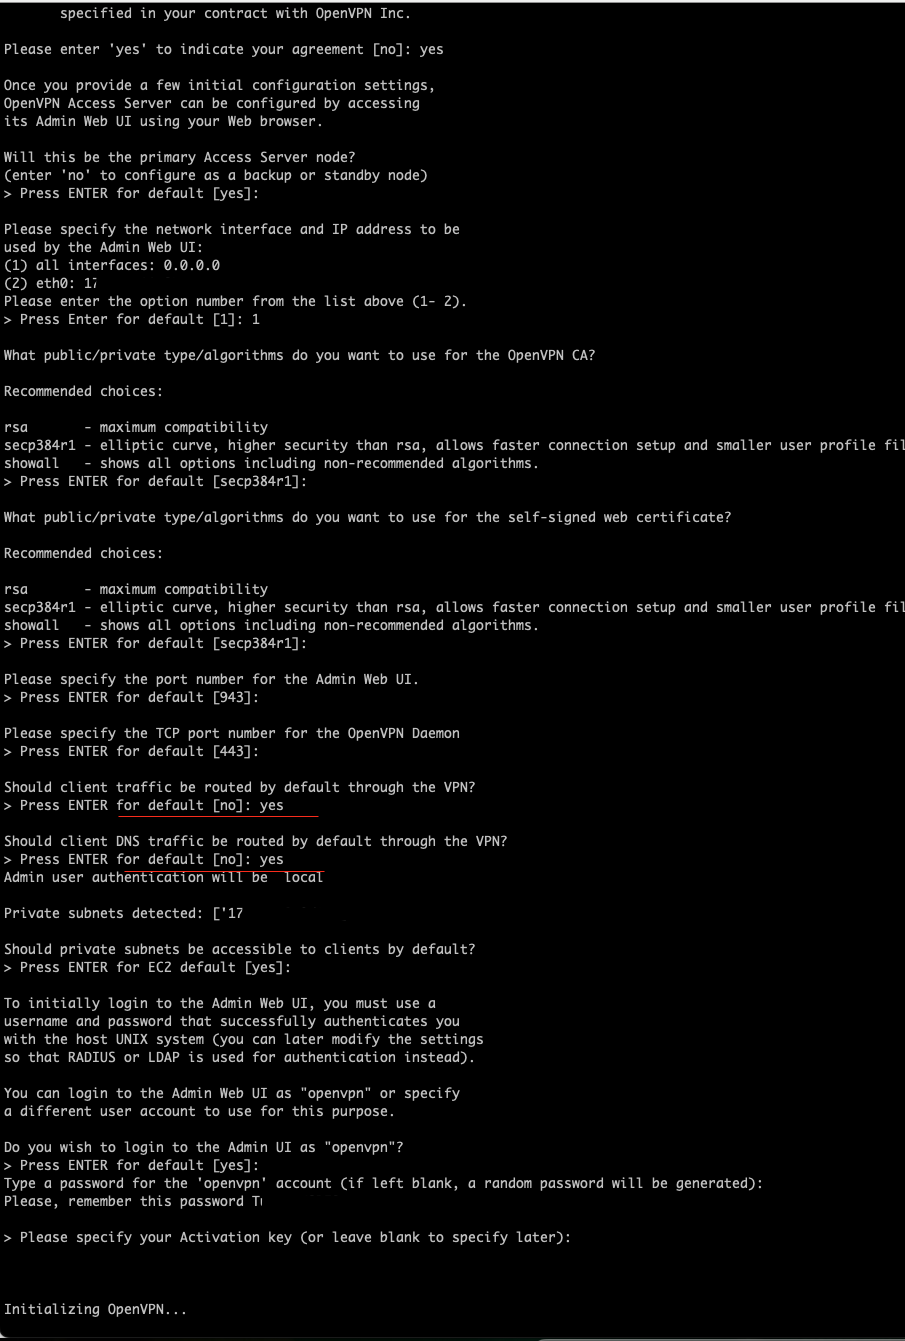
- You will be prompted to go through the initial configuration process. Follow the instructions and set the parameters according to your needs.

- Enter yes for following two options
- Should client traffic be routed by default through the VPN?
- Should client DNS traffic be routed by default through the VPN?
- Just hit enter for the rest to have all the defaults confirmed.
You will get some url finally in logs
OpenVPN AS can be accessed via these URLs:
Admin  UI: https://xx.xx.xx.xxx:943/admin
Client UI: https://xx.xx.xx.xxx:943/

To login please use the "openvpn" account with "xxxxxxx" password.
Step 3: Accessing OpenVPN Server via Web UI
Now, you can access the OpenVPN Server’s web interface.
- Open your web browser and enter the following URL:
https://your-instance-ip:943/admin. - Log in with the username and password you set during the configuration process.
- In the Admin UI, you can manage users, configure server settings, and download the OpenVPN client.
Ensure that the option for “Should client Internet traffic be routed through the VPN?” is switched to ‘Yes’.
Switch the option for “Have clients use specific DNS servers” to ‘Yes’ as well. Input the custom DNS server settings. Set the ‘Primary DNS Server’ to ‘1.1.1.1’ (which corresponds to CloudFlare DNS) and the ‘Secondary DNS Server’ to ‘8.8.8.8’ .

Step 4: Connecting to the VPN
Finally, connect to the VPN using the OpenVPN client.
- Navigate to
https://your-instance-ip/in your browser. - Log in with your username and password.
- Download the connection profile for your account.
- Install and Open the OpenVPN client, import the connection profile, and connect to the VPN.
- Verify by opening the https://whatismyipaddress.com/ site and check your ip and location, it should relfect your vpn server ip and location
And voila! You have successfully set up OpenVPN for personal use on Amazon EC2 for free. You can now enjoy a secure, private connection from anywhere in the world. Remember, the free tier of AWS comes with certain limitations, so always monitor your usage to avoid unexpected charges.
Optional
Attaching an Elastic IP to Your Amazon EC2 Instance
Elastic IPs are static addresses designed for dynamic cloud computing. An Elastic IP address is associated with your AWS account, not specific instances, and remains associated with your account until you choose to release it. You can further point your domain name to this IP address and this will not chnage on restart.
Here’s how to attach an Elastic IP to your Amazon EC2 instance, ensuring that the IP address of your VPN server does not change:
- Open the Amazon EC2 console at https://console.aws.amazon.com/ec2/.
- In the navigation pane, choose “Elastic IPs”.
- Choose “Allocate new address”, then “Allocate”.
- Select the Elastic IP address that you just allocated.
- Choose “Actions”, then “Associate IP address”.
- In the “Associate Elastic IP address” dialog box, choose the instance that you want to associate with the Elastic IP address, and then choose “Associate”.
Now, your Amazon EC2 instance will retain the same IP address even when stopped and restarted. This is particularly useful for a VPN server, as it ensures the server’s address doesn’t change, preventing the need to reconfigure clients every time the server’s IP changes.
Remember that while Elastic IPs are free when they are associated with a running instance, AWS charges for any Elastic IPs that are not associated with an instance, or are associated with a stopped instance or an unattached network interface. Therefore, to avoid unnecessary charges, remember to release any Elastic IPs that you’re not using.
Setting up SSL for your domain with Let’s Encrypt
Make sure port 80 is open by looking at instance Security groups.
Nice bash script to setup ssl for your domain with Let’s Encrypt
https://gist.github.com/sabbour/84699937169e50b29a46d7d948866f1b
Let’s Encrypt uses the client Certbot to install, manage, and automatically renew the certificates they provide
sudo certbot renew